Monday, September 30, 2013

Rainbow Cake Bites

This was originally meant to be just a rainbow cake, but the cake was not cool enough before it was taken out of the pan so it turned into Rainbow Cake Bites!

Ingredients

1 box of extra moist white cake mix
1 1/4 cups of water
3 egg whites (not important, I used 2 eggs)
1/3 vegetable oil

Instructions

You'll mostly follow the instructions on the cake box, but I'll write them here anyway.
1.  Preheat your oven to 350 degrees Fahrenheit. Grease your pan, or pans, generously. 
2.  In a large bowl, combine the cake mix, water, eggs, and oil.
3.  Our the cake mix into 6 bowls evenly.
4. Using food coloring, make the batter a different color in each bowl.  I used red, orange, yellow, green, blue, and purple.
5.  Pour the mix into your cake pan in the order of the rainbow.
6.  Bake the cake for the appropriate amount of time based on the chart below..

Two 8” round layers
35 – 40 min
Two 9” round layers
30 – 35 min
One 13” x 9” pan
35 – 40 min
One 10” or fluted tube pan
45 – 55 min
24 – 30 cupcakes (1/2 full)
20 – 25 min


Cool cake in pan for 10 to 20 minutes, when removed from pan cool the cake topside up.  After the cake is completely cooled you can frost and decorate it.  

I cooked this with a friend, and we didn't let the cake cool long enough.  This is what happened.
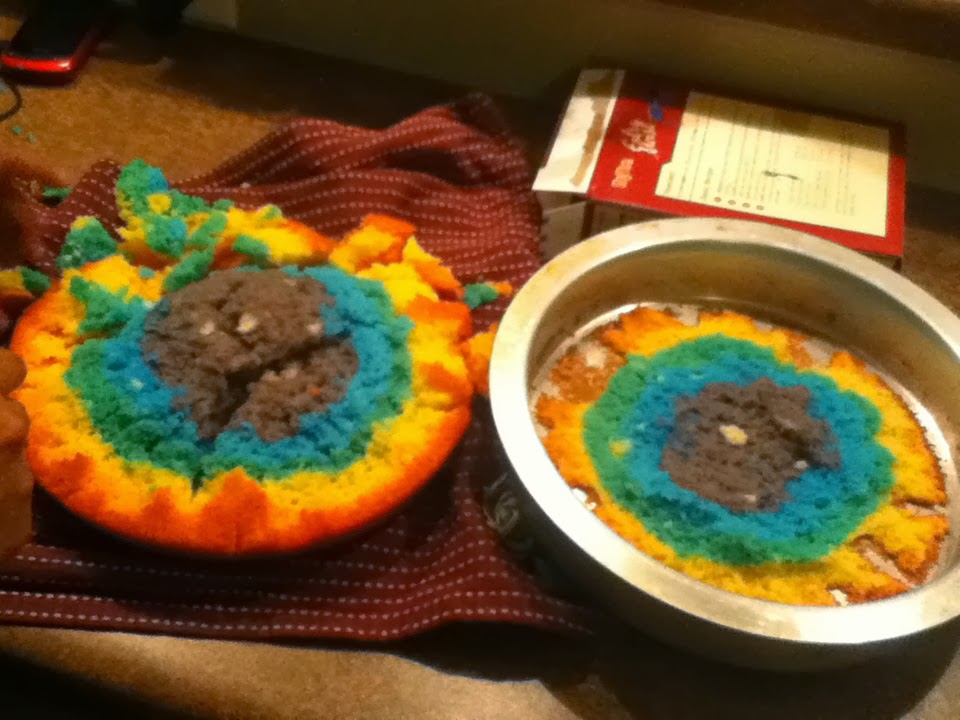


Awkward.


So to improvise we cut it into pieces and made Rainbow Cake Bites.
They were still just as good and were almost easier to eat than actual pieces of cake.  And you could choose if you wanted frosting or not, whatever you liked. One modification my friend and I made was we used 2 entire eggs, not just egg whites.  We wanted a bit more flavor in our cake and it worked really well.Enjoy!!

Crepes

I said in my About Me post that some French recipes would make their way onto my blog.  The first was Langues de Chat, and now I've made crepes!  These are shockingly easy to make and taste really good.  Once again, I made these with a friend for breakfast and they didn't take long at all either.  These also taste really good if you put nutella on them, for all you chocolate-lovers.  So, without further ado, here's the recipe!

Ingredients

3 eggs
1 1/2 cups of milk
1 cup plus 2 tbsp. of flour
1 tbsp. of sugar
1/4 tsp. salt
2 tbsp. melted butter

Instructions

1.  Mix all the ingredients in a medium bowl with a whisk.  Make sure to get everything off of the sides.  The original recipe says to refrigerate the batter for about 30 minutes, but it makes no difference.  My friend and I didn't refrigerate it at all.
2.  Grease a pan that is over medium heat.
3.  Pour about 1/3 of a cup of batter into the pan.  Wait about 45 seconds, then flip the crepe.  Lightly move the spatula around the edges of the crepe, then flip it quickly.
4.  Wait about thirty more seconds, then flip the finished crepe onto a plate.  Repeat until the batter is gone or you are happy with the number of crepes you have.  Extra batter can be refrigerated to save for another day.

My friend's favorite way to eat a crepe is with nutella and a banana, cut up or whole.  I like to eat them with nutella, peanut butter, or plain since they taste good anyway.  Other fillings include, but are not limited to, mini-chocolate chips, jam, cream cheese, ice cream, fruit like peaches and strawberries, and honey.  Everyone likes their crepes a different way, there is no right way to fill it.

Now I'll put in a picture explanation of cooking and flipping a crepe.

This is what the crepe will look like when it is ready to flip.  There will most likely not be as much brown though.

Slide the spatula around the edge to loosen up the crepe, then flip it quickly.


This is what the first side of the crepe will look like.  It looks a lot like a really flat pancake, because that's essentially what it is.


 Wait for about thirty more seconds, then flip the crepe onto a plate.


This is what the other side of the crepe will look like.  This side looks kind of like eggs to me.

Here's a more direct picture of the crepe batter when you first pour it into the pan.


If you are worried about not being able to flip the crepe, it's actually REALLY easy.  All you have to do is flip it like a pancake and you've got it!  Also, make sure you loosen up the edges, it may not sound important, but it definitely makes the whole process easier.

I hope you enjoy this simple recipe, it's really good!

Bon Appetit!!

Monday, September 23, 2013

Cinnamon Crescent Rolls

I've made this recipe multiple times and it's always received well.  It's like a modified cinnamon roll that is way easier to make than homemade cinnamon rolls.

Ingredients

1 Tube of Pillsbury Crescent Rolls

Filling:

5 tablespoons of butter
1/4 cup of white sugar
2  1/2 teaspoons of cinnamon

Glaze:

2 tablespoons of butter, melted
1/4 cup and 2 tablespoons of powdered sugar
1/2 teaspoon of vanilla

Instructions

1.  Preheat your oven to 375℉
2.  Unroll the crescent rolls onto a cookie sheet, do not grease it.
3.  Now you make the filling: mix the butter, sugar, and cinnamon in a small bowl.
4.  Spread the filling out onto the crescent rolls evenly, then roll them up.
5.  Bake the crescent rolls for 10 to 12 minutes
6.  While the crescents are cooking, you can make the glaze.  Mix the butter, powdered sugar, and vanilla.  The original recipe says to put the glaze in a plastic bag to drizzle it on, but its easier to just spoon it onto the crescent rolls.  Also, the recipe for this glaze is really flexible, if it isn't runny enough for your preferences you can add milk, about a teaspoon at a time.  Going the other way, more powdered sugar can be added to thicken up the glaze.

While these are in the oven some cinnamon filling will ooze out of the crescent, but that's expected.  These can also be stored in an air tight container, but they only taste the best on the first day they're made, especially when they are right out of the oven.

Since, I don't have any pictures, I'll provide the link to the blog where I found this since my pictures would have been essentially the same as hers.

In the past when I've made this it's always been really simple and all the ingredients are almost always around the house somewhere.  When I make for my siblings I typically have to make a double batch!

Enjoy!!